Tuesday 22 December 2015

WEBAPI FOR BEGINERS OR FRESHERS

ASP.NET Web API

Introduction

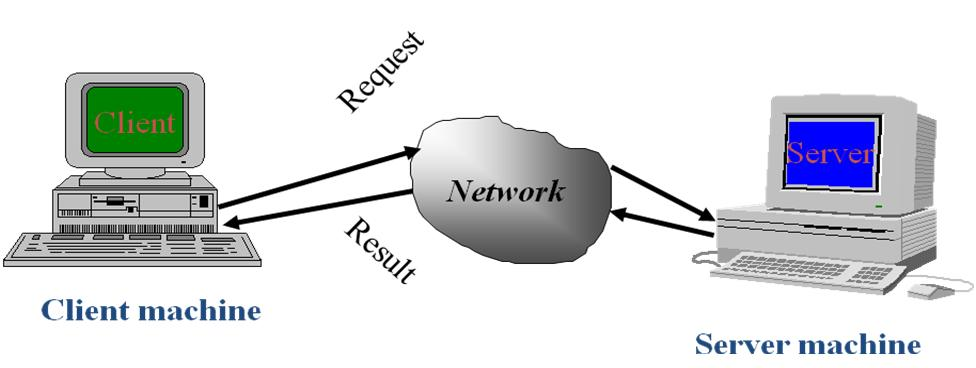
A web API is just an application programming interface (API) over the web (that is, HTTP). When the resources of an application can be manipulated over HTTP using the standard HTTP methods of GET, POST, PUT, and DELETE, you can say that the application supports a web API for other applications to use. Because HTTP is platform-agnostic, HTTP services can be consumed by disparate devices across different platforms.
 A central concept of HTTP services is the existence of resources that can be identified through a uniform resource identifier (URI). If you equate resources to nouns, then actions on a resource can be equated to verbs and are represented by the HTTP methods such as GET, POST, PUT, and DELETE. For an application that deals with the Users of an organization, each User is a resource the application deals with.
 Let us see how an User’s details can be retrieved with an HTTP service. The URI is http://server<port>/API/Users/1000. It includes the User ID and serves as an identifier to the resource, which is an User in this case. Actions on this resource are accomplished through the HTTP verbs. To get the details of an User, you will perform an HTTP GET on the URIhttp://server<port>/API/Users/1000. To update this User, the request will be an HTTP PUT on the same URI. Similarly, to delete this User, the request will be an HTTP DELETE request, again on the same URI. To create a new User, the request will be an HTTP POST to the URI without any identifier (http://server<port>/API/Users).

LET US CREATE WEBAPI

Let us do something practical here. you will create a simple web API that basically exposes an in-memory List<User> over HTTP, for a client application to manipulate the list members. I know this is just limited or small concept but i am sure this will give you clear concept about what webAPI is and how to use it or will give you  understanding how to use the ASP.NET Web API framework to build your web API.

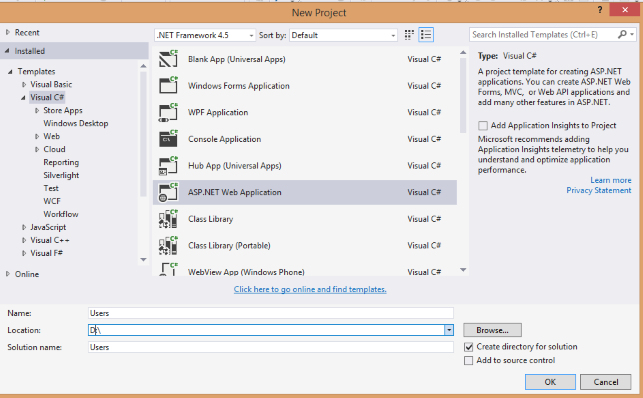
  1. Run Visual Studio and create a new project like shown below Give the project a name of Users and click OK, as shown in Figure 1-1.
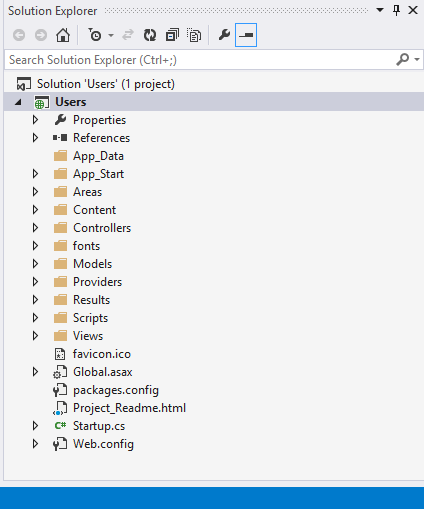
  2. Select the ASP.NET Web template and click OK. You will see lots of option, as shown in Figure 1-2.


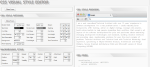
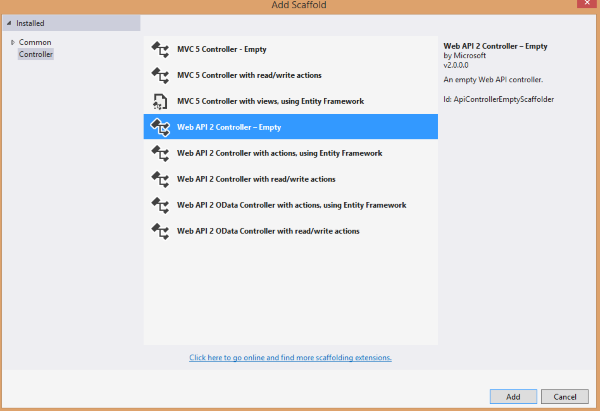
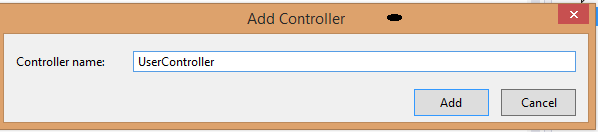
  3. Choose the Controllers folder in the Solution Explorer of Visual Studio. Select Add ➤ Controller and give a name of UsersController for the controller. Leave the option Empty API Controller selected in the Template dropdown and click Add, as shown in Figure 1-3. Notice that the generated controller class inherits from ApiController, a class that is part of the ASP.NET Web API framework.
  4. Right-click the Models folder in the Solution Explorer of Visual Studio. Select Add ➤ Class to add a new class with a name of User
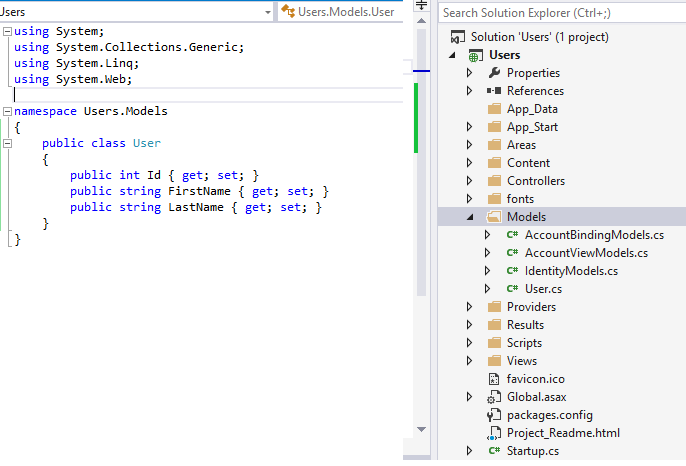
  5. Add the code shown in Listing 1-3 to the User class. Listing 1-3. The User Class
    public class User
    {
    public int Id { get; set; }
    public string FirstName { get; set; }
    public string LastName { get; set; }
    }
    
  6. Create a new static field at the controller level, as shown in Listing 1-4. This will be the list that our web API exposes over HTTP. Figure 1-3. Adding a controller
    Listing 1-4. The List of Users
    using System;
    using System.Collections.Generic;
    using System.Linq;
    using System.Net;
    using System.Net.Http;
    using System.Web.Http;
    using Users.Models;
    namespace Users.Controllers
    {
    public class UsersController : ApiController
    {
    private static IList<User> list = new List<User>()
    {
    new User()
    {Id = 1000, FirstName = "Shabir", LastName = "Hakim" },
    new User()
    {Id = 1001, FirstName = "Raja", LastName = "Public"},
    new User()
    {Id = 1002, FirstName = "Rani", LastName = "Private"},
    new User()
    {Id = 1003, FirstName = "Shabir", LastName = "Robert" }
    };
    // Action Get methods go here
    // GET api/Users
    public IEnumerable<User> Get()
    {return list;}
    // GET api/Users/1000
    public User Get(int id)
    {return list.First(e => e.Id == id);}
    }
    }
    
    Note Note: Since you used the User class, which is in a different namespace than HelloWebApi.Models in the controller class, you will need to add a using directive. In Visual Studio, the User references in the preceding code will have a wavy underline in red; right-click any of them and select Resolve ➤ using HelloWebApi.Models. This will add the necessary directive. This is a standard procedure and I will not repeat this step in later exercises, for the sake of brevity.
  7. Add five action methods, as shown in Listing 1-5. It is important to use the name as shown in the listing. You will learn more about why you must follow this naming convention in the next exercise. Listing 1-5. The Action Methods to Get, Post, Put, and Delete Users
    // GET api/Users
    public IEnumerable&ltUser> Get()
    {
    return list;
    }
    // GET api/Users/1000
    public User Get(int id)
    {
    return list.First(e => e.Id == id);
    }
    
    // POST api/Users
    public void Post(User User)
    {
    int maxId = list.Max(e => e.Id);
    User.Id = maxId + 1;
    list.Add(User);
    }
    // PUT api/Users/1000
    public void Put(int id, User User)
    {
    int index = list.ToList().FindIndex(e => e.Id == id);
    list[index] = User;
    }
    // DELETE api/Users/1000
    public void Delete(int id)
    {
    User User = Get(id);
    list.Remove(User);
    }
    
  8. Build the Visual Studio solution and run it by pressing F5. Internet Explorer, which is the default browser associated with Visual Studio, shows the home page with a URL of http://localhost:55778/. (My ASP.NET Web API project uses port 55778. Your project will use a different one and based on that, Internet Explorer will display a different port in the URL.)
  9. In the address bar type http://localhost:<port>/api/Users Replace <port> with the actual port your application runs on.
    NoteNote:As you work through the exercises in this book, you will create several new projects, and the port will change every time you create a new ASP.NET MVC project. Remember to replace the port specified in the example code with your application’s actual port.
  10. When Internet Explorer asks if you want to open or save, click Open and choose Notepad as the program to open the file. Notepad will display JSON as shown in Listing 1-6. I have formatted the output for your reading pleasure.

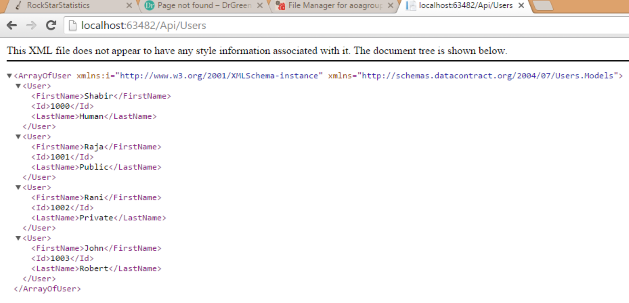
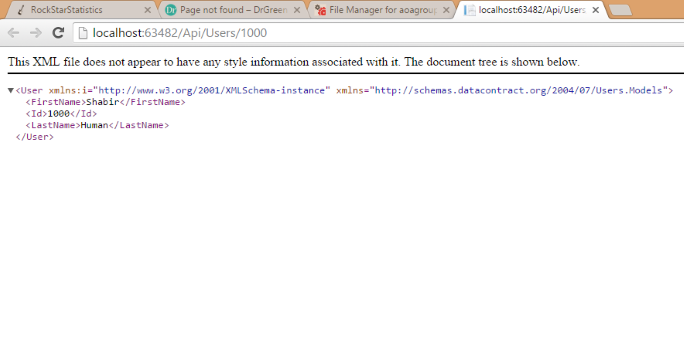
  11. You can also get the details of a specific User by performing an HTTP GET on http://localhost:63482/Api/Users/1000. In this case, you get the JSON output shown in Listing 1-7.

  12. If you see the preceding two JSON outputs, you have just created your first web API and exposed the in-memory list of Users to the outside world over HTTP! Currently, we have tested only the HTTP GET but we will test the other methods in the upcoming exercises.
     

Saturday 12 September 2015

What is MongoDB and how it differs from RDMS ? USING MongoDB with Visual studio and C#

ASSUMPTION:You have basic knowledge of Sql and c# and you have created already user table(collection ) in mongodb.
2. You have downloaded mongodb driver . I choose N-Get package manager. here is screen shot of how to refer mongodb driver


3.Set references to your visual studio project like shown below

INTRODUCTION:Let us just recall how our traditional RDBM looks like, It is just based on tables made of rows and columns.Similarly  mongoDB are based on collection of documents, with each of these documents consisting of key/value attributes(JSON format).  A single document can be thought of as the equivalent of a row in a table, with each key being similar to a column name and each key’s value being similar to the respective row’s value.
Here is the view of database collection where four rows(documents) are saved


The exact difference being that a document is not constrained to a certain schema or columns within a table.  Two documents can share similar elements, like an ID field, as well as having completely different elements.   Data representation in both look like shown below

RDBMS NOSQL
.
.

just to recap, MongoDB is made up of databases which contain collections. A collection in turn is made up of documents.Each document is made up of fields. Collections can be indexed, which improves lookup and sorting performance.  The core difference is that relational databases define columns at the table level whereas a document-oriented database defines its fields at the document level. 
In MongoDB, the data structure and hierarchy are like:
Databases
   Collections
      Documents
         Fields
A field is a key-value pair. A key is a name (string). A value is a basic type like string, integer, float, time-stamp, binary, etc., or a document, or an array of values.
Conclusively you can say, collections are made of JSON-like documents. This is the main difference from traditional RDBM.
Note: The  BSON  is a binary-encoded serialization of J SON-like documents.It is just lightweight, traversable, and efficient.

Why MongoDB

MongoDB is an open-source document database that provides high performance, high availability, and automatic scaling what else you need if your business data is huge or growing fast ?

IMPORTANT CONCEPTS

  • A database can have zero or more collections. A collection shares enough in common with a traditional table that you can safely think of the two as the same thing.
  • Collections are made up of zero or more documents. Again, a document can safely be thought of as a row.
  • a lot like columns.
  • Indexes in MongoDB function mostly like their RDBMS(oracle sql server,sybase) counterparts.

The Benefits of NoSQL

  • Large volumes of structured, semi-structured, and unstructured data
  • Agile sprints, quick iteration, and frequent code pushes
  • Object-oriented programming that is easy to use and flexible
  • Efficient, scale-out architecture instead of expensive, monolithic architecture

Windows Platform Support

Starting from MongoDB version 2.2, MongoDB doesn’t support Windows XP. So if you are on Windows XP, either upgrade it or use the lower versions of MongoDB. This tutorial is intended to help you in installing MongoDB on Windows latest versions i.e Windows 7 and Windows 8, 8.1 etc.

Installation of MongoDB on Windows

Follow below steps to perform the installation of MongoDB into your windows system.
  1. Consider specific MongoDB build type which you need actually Three build types of MongoDB for Windows are available.
MongoDB for Windows Server 2008 R2 series: This build type runs only on 2008R2, Windows 7 64-bit, Windows 8, and latest versions of Windows.
MongoDB for Windows 64-bit: This build type of MongoDB runs on any 64-bit version of Windows latest than Windows XP, involve Windows Server 2008 R2 and Windows 7 64-bit.
MongoDB for Windows 32-bit: MongoDB runs on any 32-bit version of Windows latest than Windows XP, 32-bit version of MongoDB are only designed for older system and use for testing and developing systems. Windows 32-bit versions of MongoDB support only database smaller than 2GB.


  • Download MongoDB for Windows
  • download the latest version release from the MongoDB Download page. Make sure you download the latest version of MongoDB for your Windows. Note that 64-bit versions of MongoDB do not run with 32-bit Windows.
  • MongoDB installation folder move to another location (Optional) Sometimes we want to move the installation to another directory, we can use move command for this. This command needs to be run as administrator. For example, to move the folder to C:\MongoDB follow the steps shown in below images.
  • MongoDB does not depend at any other system because it is self contained. You can execute MongoDB from the folder of your choice and can install it in any folder (for, me it is programFiles folder like C:\Program Files\MongoDB\Server\3.0\bin)

    Running MongoDB Server

    We need to create a directory where MongoDB server will store all it’s data. The MongoDB default data directory path is \data\db. Make this folder using the following commands from Command Prompt. Note that if the directory doesn’t exists, MongoDB will try to create it. But it’s good to create it before hand.
    Microsoft Windows [Version 6.3.9600]
    (c) 2013 Microsoft Corporation. All rights reserved.
    C:\>md \data\db

    To start MongoDB server, we need to run mongod.exe just fallow below listed commands


    Note: I am setting path just to run mongodb from c drive every time rather than going to installation folder every time
    This MongoDB starts the main databases process. The waiting for connection message in the console results determines that the mongod.exe process is complete.

    you will see below


    You can use a different path for data files using the –dbpath option to mongod.exe, for example:

    Getting Started with MongoDB and C#

    So, let’s get started!

    EXAMPLE:

    In the MongoDB world, the Document class is the center of it’s universe. Because the very concept of the database is built upon the concept of this document, this is what you’ll find yourself using most. You use them to insert data, update data, delete data, query data. You will find it easy
    Here’s where I’m going to write code it do some database related operations like INSERT UPDATE SELECT..
    Here you see
    Please note that i am not fallowing coding best practice just for the sake of making code more understandable.
    CODE BEHIND FILE

    using MongoDB.Bson;
    using MongoDB.Bson.IO;
    using MongoDB.Bson.Serialization;
    using MongoDB.Bson.Serialization.Serializers;
    using MongoDB.Driver;
    using MongoDB.Driver.Builders;
    using System;
    using System.Configuration;
    using System.Globalization;
    using System.Linq;
    using System.Web;
    using System.Web.UI;
    using System.Web.UI.WebControls;
    namespace AspAppwithMongoDb
    {
    public partial class _Default : Page
    { 
    protected void Page_Load(object sender, EventArgs e)
    { 
    
    }
    protected void btnSave_Click(object sender, EventArgs e)
    {
    //Get Connection Details 
    var strConn = new MongoConnectionStringBuilder(ConfigurationManager.ConnectionStrings["MongoDB"].ConnectionString);
    var server = MongoServer.Create(strConn);
    // Create a myUser object from database by using the connection string 
    MongoDatabase myUser = server.GetDatabase(strConn.DatabaseName); 
    //get mongodb collection
    var collection = myUser.GetCollection<User>("User");
    //document just like record/row in rdbms
    BsonDocument doc = new BsonDocument();
    doc["FirstName"] = txtFirstName.Text;
    doc["lastname"] = txtLastName.Text;
    collection.Insert(doc);
    lblSuccess.Text = "Saved Successfully";
    }
    
    protected void btnView_Click(object sender, EventArgs e)
    {
    
    //Get Connection Details 
    var strConn = new MongoConnectionStringBuilder(ConfigurationManager.ConnectionStrings["MongoDB"].ConnectionString);
    var server = MongoServer.Create(strConn);
    // Create a myUser object from database by using the connection string 
    MongoDatabase myUser = server.GetDatabase(strConn.DatabaseName); 
    MongoCollection<User> Users =
    myUser.GetCollection<User>("User");
    nameLabel.Text = nameLabel.Text + "<table class='table'><thead><th>First Name</th><th>Last Name</th></thead>";
    foreach (User usr in Users.FindAll())
    {
    nameLabel.Text = nameLabel.Text + "<tr>";
    nameLabel.Text = nameLabel.Text + "<td>" + usr.FirstName + "</td>";
    nameLabel.Text = nameLabel.Text + "<td>" + usr.lastname + "</td>";
    nameLabel.Text = nameLabel.Text + "</tr>";
    }
    nameLabel.Text = nameLabel.Text + "</table>"; 
    }
    
    protected void btnUpdate_Click(object sender, EventArgs e)
    {
    //Get Connection Details 
    var strConn = new MongoConnectionStringBuilder(ConfigurationManager.ConnectionStrings["MongoDB"].ConnectionString);
    var server = MongoServer.Create(strConn);
    // Create a myUser object from database by using the connection string 
    MongoDatabase myUser = server.GetDatabase(strConn.DatabaseName);
    var collection = myUser.GetCollection<User>("User");
    var update = new UpdateDocument { 
    { "$set", new BsonDocument("lastname",txtLastName.Text) } };
    
    var query = new QueryDocument { {"lastname", "" } };
    collection.Update(query, update);
    
    lblSuccess.Text = "Updated Successfully";
    }
    
    }
    public class User
    {
    public ObjectId _id { get; set; }
    public string FirstName { get; set; }
    public string lastname { get; set; }
    } 
    }

    ASPX PAGE


    <%@ Page Language="C#" AutoEventWireup="true" CodeBehind="default.aspx.cs" Inherits="AspAppwithMongoDb._default" %>
    
    <!DOCTYPE html>
    
    <html xmlns="http://www.w3.org/1999/xhtml">
    <head runat="server">
    <title></title>
    </head>
    <body>
    <form id="form1" runat="server">
    <div>
    <style>
    table{
    width:50%;
    border:1px solid #f2f2f2;
    padding:5px;
    }
    
    </style>
    <asp:Literal ID="nameLabel" runat="server"></asp:Literal>
    <br />
    
    <table>
    <tr><td class="auto-style1">
    <asp:Button ID="btnView" runat="server" Text="View Records" OnClick="btnView_Click" />
    </td><td class="auto-style1" colspan="2">&nbsp;</td></tr>
    <tr><td>FirstName</td><td colspan="2"> <asp:TextBox ID="txtFirstName" runat="server"></asp:TextBox></td></tr>
    <tr><td>LastName</td><td colspan="2"> <asp:TextBox ID="txtLastName" runat="server"></asp:TextBox></td></tr>
    <tr><td>&nbsp;</td><td colspan="2"> 
    <asp:Label ID="lblSuccess" runat="server" ForeColor="#33CC33"></asp:Label>
    </td></tr>
    <tr><td>&nbsp;</td><td colspan="2"> <asp:Button ID="btnSave" runat="server" Text="Save Record" OnClick="btnSave_Click" /> 
    </td></tr>
    <tr><td>
    First Name Update</td><td>
    <asp:TextBox ID="txtupdatefirstname" runat="server"></asp:TextBox>
    &nbsp;New FirsName</td><td>
    <asp:TextBox ID="txtupdatefirstnameto" runat="server"></asp:TextBox>
    </td></tr>
    
    <tr><td>
    &nbsp;</td><td>
    &nbsp;</td><td>
    <asp:Button ID="btnUpdate" runat="server" Text="Update Record" OnClick="btnUpdate_Click" />
    </td></tr>
    
    </table>
    </div>
    </form>
    </body>
    </html>
    
    WEBCIONFIG.XML


    Using MongoVUE Is just like SQL Management tool which help you to handle database operation using GUI

    A nice GUI makes it easy. Fortunately  for us MongoVUE exists and provides a very pleasant SQL Management Studio like experience over MongoDB
    First download and install MongoVUE.

    Next, run MongoVUE and connect to the default “local” connection. Once connected you should see a User . If you double click the Club node a table view will be rendered, expand the first document to see its data:


    Or click Text View to see the raw document.if you are interested in learning more of its features, read through its tutorials.

    Hope this helps

    Shabir Hakim

    Saturday 29 August 2015

    Start Working With NodeJS And SqlLite On Windows using Visual Studio


    Assumptions

    This article expects that you have at least a minimal understanding of .NET development and object-oriented programming concepts. With a heavy focus on web development,this article also assumes that you have a basic understanding of ASP.NET, including the core concepts of web development contained in ASP.NET, such as clients and servers,HTML, CSS, JavaScript, and HTTP post/get.
    The article also assumes that you have an IDE in which to work, specifically a fairly recent version of Visual Studio.

    Source code:


    Introduction

    Well, I believe the first thing which comes in mind here is what is nodeJs and why nodeJS?
    If you have working knowledge of JavaScript and some other server side technology like ASP.NET,PHP or JSP then definitely you will understand why nodeJS?

    What is NodeJS

    Till now we had a concept like javascript is meant for client side scripting only but 'NO'. JavaScript has server side version called nodeJS which behaves or is like other server side technologies like asp.net,php,jsp .Node.js  but allows you to run JavaScript code in the back end, outside a browser. In order to execute the JavaScript you intend to run in the back end, it needs to be interpreted and, well, executed. This is what Node.js does, by making use of Google's V8 VM, the same run-time environment for JavaScript that Google Chrome uses.

    Why NodeJS

    Simple, Node.js has great capability when implementing real-time web applications using push technology over web-sockets. What is great about it? It is almost after 2 decades we have worked with stateless of web application, we finally have web applications with real-time, two-way connections, where both the client and server can initiate communication, allowing them to exchange data freely. This is in contrast to the typical web response pattern , where the client always initiates communication. Apart, it’s all based on the open web stack (HTML, CSS and JS) running over the standard port 80.all free :)
    Plus, Node.js ships with a lot of useful modules, so you don't have to write everything from scratch, like for example something that outputs a string on the console.
    If javascript runs on server side the question arises here is how to install environment to start with  nodeJS .Here are the ways you can setup or install nodeJS
    So you can say nodeJS technology is all about real-time applications

    Features of Node.js

    Following are some of the important features that make Node.js the first choice of software architects.
    • Asynchronous and Event Driven All APIs of Node.js library are asynchronous that is, non-blocking. It essentially means a Node.js based server never waits for an API to return data. The server moves to the next API after calling it and a notification mechanism of Events of Node.js helps the server to get a response from the previous API call.
    • Very Fast Being built on Google Chrome's V8 JavaScript Engine, Node.js library is very fast in code execution.
    • Single Threaded but Highly Scalable - Node.js uses a single threaded model with event looping. Event mechanism helps the server to respond in a non-blocking way and makes the server highly scalable as opposed to traditional servers which create limited threads to handle requests. Node.js uses a single threaded program and the same program can provide service to a much larger number of requests than traditional servers like Apache HTTP Server.
    • No Buffering - Node.js applications never buffer any data. These applications simply output the data in chunks.
    • License - Node.js is released under the MIT license

    Install Node.js Tools for Visual Studio

    Available Releases
    • NTVS 1.1 Beta includes support for Visual Studio 2012, 2013, and 2015 RC
    • NTVS 1.0 includes support for Visual Studio 2012 and 2013
    • Dev Builds include the most recent changes and bugfixes (available for Visual Studio 2012, 2013, and 2015)
    • Older NTVS releases are also available.

    Installation Steps:

    STEP1 download windows installer on basis of your visual studio version you have from above location .once downloaded you will find below installer like shown below


    STEP2
    Click on above windows installer, you will see below screen. Accept terms and click Next


    STEP3 NTVS requires a Node.js interpreter to be installed. You can use a global installation of Node.js or you can specify the path to a local interpreter in each of your Node.js projects.
    Node.js is built for 32-bit and 64-bit architectures. NTVS supports both. Only one is required and the Node.js installer only supports one being installed at a time. NTVS works with Node.js v0.10.20 or later.


    Package management

    npm is the pre-installed package manager for the Node.js server platform exactly like Nget Package Manager for .Net IDE environment. It is used to install Node.js programs from the npm registry. By organizing the installation and management of third-party Node.js programs, it helps developers build faster. The packages found in the npm registry can range from simple helper libraries like Underscore.js to task runners like Grunt.
    Below is the screen shot of NPM

    Start a new Node.js project in Visual Studio

    Starting a new Node.js project like shown below
    1. Start Visual Studio.On the File menu, click New, and then click Project like other type of projects.
    2. In the New Project window, expand the Installed menu selection, expand Templates, and click JavaScript. In the main window, select Blank Node.js Web Application. Now your choice of choosing a path and name for your project, and then click OK.

    3. You will be presented with the following screen. You will SEE server.js file in the Solution Explorer .You will see sample or default "Hello world" application  like shown below
    4. You can now debug your node.js web application in your preferred browser like shown below.

    5. OUTPUT will be like

    LET US ANALYZE A DEFAULT  "Hello World" app in Node.js

    Here’s the code used in the server.js file

    The generated code example or sample program shows you how to output "Hello World" in the browser. Let me explain how the generated code in server.js works line by line. 

    Line 1

    var http = require('http');
    Node.js has a simple module and dependencies loading system. You simply call the function "require" with the path of the file or directory containing the module you would like to load at which point a variable is returned containing all the exported functions of that module.

    Line 2

    var port = process.env.port || 1337;
    On this line, we want to determine on which port the HTTP server serving the HTML should run. If a port number is specified in the environment variables, we will use that one or we will simply use 1337.

    Line 3

    http.createServer(function (req, res) {
    We want to create a server to handle HTTP requests. We will also pass the createServer function a function callback containing two parameters to a handle each individual request and return a response.   if you’ve never encountered callback functions in JavaScript. The request received is passed in the req parameter and the response is expected to written to the res parameter.

    Line 4

    res.writeHead(200, { '
    Content-Type’: '
    text/plain’ });
    Any HTTP response requires a status-line and headers, . In this case, we want to return 200 OK as the status response and to specify the content-type as plain text. We specify this by calling the writeHead function on the response object.

    Line 5

    res.end('
    Hello World\n’);
    Once we are done writing the response we want to call the end function. We can also pass the final content through the end function, in this case we want to send the string "Hello World" in plain text.

    Line 6

    }).listen(port);
    We close off the callback and call the function listen at the port we defined earlier, this will start the server and start accepting requests sent to the defined port.
    To see the result, you can start debugging by pressing on the button shown in the previous screenshot. You can see "Hello World" in the browser.


     You have now successfully run a Node.js app on Windows 8.1 using Visual Studio 2013.

    INTERACTING WITH DATABASE:

    For Simplicity I am going to use SQLLite database . you can use any database here is the explanation Database Drivers
    SQLite is transaction database engine, it means you can run DDL and DML queries of SQL. DDL queries deal with creation of database, tables, view etc where as DML queries are responsible for CRUD operation (insert,delete,update) etc. Here is a code to create SQLite database and performing SQL operations.

    GET SQLLITE PACKAGE FOR NODEJS

    Go to nodejs console and run


    Modify existing sample code with below line

    Just Click on Debug/Run in visual studio and the output will be like shown below

    To run and analyse the code, you can simply use breakpoints in visual studio and see whether it creates Employee_Master table  and add two columns[EmployeeId,EmployeeName) with some 10  numbers of rows. You can view number of rows from  console because console.log is displaying all the rows from created table
    OR
    if you will open sqllite database using admin tool you will see below screen with table name Emplyee_Master

    1.  

      More learning for Node on Azure

      For more in-depth learning on node, my course is available here on Microsoft Virtual Academy.

    Saturday 11 April 2015

    CSS3 Explained with live example ? Why it is required?


    SEE LIVE Example

    What are CSS3 Animations?

    The CSS animation feature was introduced into Webkit in 2007. In 2009 a working draft was written and added to the w3c site.
    To use CSS animation, the most important and key concept is key-frames.you first specify some keyframes for the animation - basically what styles will the element have at certain times. The browser does the rest for you.
    Animation is the process of creating motion and shape change or in real , illusion by means of the rapid display of a sequence of static images that minimally differ from each other. An animation lets an element gradually change from one style to another.
    If you want to achieve such motion or movement of elements on web  using css3 (rather than depending on tools like flash,silverlight..) you can define it as CSS3 animation  You can change as many CSS properties you want, as many times you want.To use CSS3 animation, you must first specify some keyframes for the animation.Keyframes hold what styles the element will have at certain times .

    Why CSS3 includes animation?

    People who have experienced or worked with web they will definitely realize that animation was possible only by using heavy tools like flash ,silverlight..which was more about moving web experiences/website designing to software development components… In other words, we were using above mentioned tools for creating animation components which was heavy ,dependent and cumbersome experience.I don't disagree that Flash, Silver-light, AJAX, CSS – are all merely tools and all of them powerful in their own way – all of them appropriate for certain application.
    It is really great and very exciting that CSS3 styling language has support for Animation – Agree,we still have to wait bit to see how the standard is implemented across all browsers
    Finally leaving all religious favor-ism to tools  ,we have to agree css3 with animation is big change in web experience and will give boost to web experience

    CSS3 ADVANTAGES:


    There are mainly three key advantages over traditional Flash/silverlight and JS script-driven animation techniques:
    1. CSS3 Animation is declarative and easy to use for simple animations; you can create them without even having to know JavaScript.
    2. The animations run well because rendering engine can use frame-skipping and other techniques to keep the performance as smooth as possible.
    3. Giving power to browser for control the animation sequence which is surely optimized and efficient, for example, reducing the update frequency of animations running in tabs that aren't currently visible.


    The Building Blocks of Animations

    CSS animations are made up of two basic building blocks.
    1. Keyframes - define the stages and styles of the animation.
    2. Animation Properties - assign the @keyframes to a specific CSS element and define how it is animated.

    1 )@keyframes

    When you specify CSS styles inside the @keyframes rule, the animation will gradually change from the current style to the new style at certain times.To make an animation work on webpage, we must bind bind the animation to respective element like div,span,image...
    Let us take simple example to understand css3 animation
    The following example binds the "example" animation to the <div> element. The animation will lasts for 4 seconds, and it will gradually reduce the width   of the <div> element from 100px to 10px:

    SEE LIVE Example


    After change animation-count property to infinite


    <!DOCTYPE html>
    <html>
    <head>
    <style>
    div {
    width: 400px;
    height: 100px;
    background-color: red;
    -webkit-animation-name: example; /* Chrome, Safari, Opera */
    -webkit-animation-duration: 4s; /* Chrome, Safari, Opera */
    animation-name: example;
    animation-duration: 4s;
    }

    /* Chrome, Safari, Opera */
    @-webkit-keyframes example {
    from {width: 400px;}
    to {width: 10px;}
    }

    /* Standard syntax */
    @keyframes example {
    from {width: 400px;}
    to {width: 10px;}
    }
    </style>
    </head>
    <body>


    <div></div>

    <p><b>See:</b> When an animation is over, it will return its  original style.</p>

    </body>
    </html>
    In the example above we have specified when the style will change by using the keywords "from" and "to" (which represents 0% (start) and 100% (complete)).


    2: Animation Properties

    Once the @keyframes are defined, the animation properties must be added in order for your animation to function.
    Animation properties do two things:
    1. They assign the @keyframes to the elements that you want to animate.
    2. They define how it is animated.
    The animation properties are added to the CSS selectors (or elements) that you want to animate. You must add the following two animation properties for the animation to take effect:
    • animation-name: The name of the animation, defined in the @keyframes.
    • animation-duration: The duration of the animation, in seconds (e.g., 5s) or milliseconds (e.g., 200ms).

    Delay an Animation

    The animation-delay property specifies a delay for the start of an animation.The following example has a 3 seconds delay before starting the animation:
    Example
    div {
        width: 400px;
        height: 100px;
        background-color: red;
        position: relative;
        animation-name: example;
        animation-duration: 4s;
        animation-delay: 3s;
    }

    Set How Many Times an Animation Should Run

    The animation-iteration-count property specifies the number of times an animation should run.
    The following example will run the animation 5 times before it stops:
    Example
    div {
       width: 400px;
        height: 100px;
        background-color: red;
        position: relative;
        animation-name: example;
        animation-duration: 4s;
        animation-iteration-count: 5;
    }

    The following example uses the value "infinite" to make the animation continue for ever:
    Example
    div {
       width: 400px;
        height: 100px;
        background-color: red;
        position: relative;
        animation-name: example;
        animation-duration: 4s;
        animation-iteration-count: infinite;
    }

    Run Animation in Reverse Direction or Alternate Cycles

    The animation-direction property is used to let an animation run in reverse direction or alternate cycles.
    The following example will run the animation in reverse direction:
    Example
    div {
        width: 400px;
        height: 100px;
        background-color: red;
        position: relative;
        animation-name: example;
        animation-duration: 4s;
        animation-iteration-count: 3;
        animation-direction: reverse;
    }

    The following example uses the value "alternate" to make the animation first run forward, then backward, then forward:
    Example
    div {
        width: 400px;
        height: 100px;
        background-color: red;
        position: relative;
        animation-name: example;
        animation-duration: 4s;
        animation-iteration-count: 3;
        animation-direction: alternate;
    }

    Specify the Speed Curve of the Animation

    The animation-timing-function property specifies the speed curve of the animation.
    The animation-timing-function property can have the following values:
    • ease - specifies an animation with a slow start, then fast, then end slowly (this is default)
    • linear - specifies an animation with the same speed from start to end
    • ease-in - specifies an animation with a slow start
    • ease-out - specifies an animation with a slow end
    • ease-in-out - specifies an animation with a slow start and end
    • cubic-bezier(n,n,n,n) - lets you define your own values in a cubic-bezier function
    The following example shows the some of the different speed curves that can be used:
    Example
    #div1 {animation-timing-function: linear;}
    #div2 {animation-timing-function: ease;}
    #div3 {animation-timing-function: ease-in;}
    #div4 {animation-timing-function: ease-out;}
    #div5 {animation-timing-function: ease-in-out;}

    How to use CSS3 animation


    All in one example


    The animations presented below involve setting up a transformation to take place in response to a mouseover or other event. Then, rather than applying the effect instantly, we assign a transition timing function which causes the transformation to take place incrementally over a set time period.

    This is all illusion what we are creating with below sprite image with all possible steps of human while walking. you can choose horse,tiger .. any sprite image and find same animation.In reality we are showing one image at once with small small delay,which make feeling like an object is walking.
    Let's get the  use for step easing out of the way: sprite animation.  The implementation is simple: jump the position of a background-image (which has all the frames of an animation laid out side-by-side) so that we see one "frame" at a time:


    Steps()

    The steps() function controls exactly how many keyframes will render in the animation time-frame.

    Complete Stunning Example


    <html>
    <head> 
    <title>Hello this is test</title>
    <style>
        .runninggirl {
            margin-left: 400px;
            width: 68px;
            height: 100px;
            background-image: url("http://www.shabirhakim.net/img/ladyrun.png");
            -webkit-animation: play .8s steps(5) infinite;
            -moz-animation: play .8s steps(5) infinite;
            -ms-animation: play .8s steps(5) infinite;
            -o-animation: play .8s steps(5) infinite;
            animation: play .8s steps(5) infinite;
        }
    
        @-webkit-keyframes play {
            from {
                background-position: 0px;
            }
    
            to {
                background-position: -500px;
            }
        }
    
        @-moz-keyframes play {
            from {
                background-position: 0px;
            }
    
            to {
                background-position: -500px;
            }
        }
    
        @-ms-keyframes play {
            from {
                background-position: 0px;
            }
    
            to {
                background-position: -500px;
            }
        }
    
        @-o-keyframes play {
            from {
                background-position: 0px;
            }
    
            to {
                background-position: -500px;
            }
        }
    
        @keyframes play {
            from {
                background-position: 0px;
            }
    
            to {
                background-position: -500px;
            }
        }
    </style>
    </head>
    
    <body>
    <div class="runninggirl">
    </div>
    </body>
    </html> 


    SEE LIVE Example

     More Resources

    HOW TO BUY ,CREATE & HOST OR DEPLOY YOUR OWN WEBSITE

    Introduction A website is a collection of Web pages, images, videos or other digital assets that is hosted on...